Friday, October 9, 2009

Great Room Project, Thursday 10/8

Floor Prep 2

Today: more glamour, more kneepads.
Plus lots of nails and particle board sawdust, to boot.

The first thing was to get out the old circular saw and chop out the rest of that water damaged spot. This required some judgment as to the depth of cut, but I was able to set it so it didn’t cut into the subfloor underneath. Erring on the shallow side, I finished the cut by tapping with a chisel.

Then off to the garage to cut out the patches. The garage is full of junk from the great room, so the table saw is pretty much buried. As in three-dimensionally buried. I wasn’t going to excavate it for one long cut. So I clamped a fence on to the workpiece and used the circular saw. Not bad. I didn’t get the small area cut out perfectly square (dang!), so I just cut the patch to match.

Set patches in place, extend the existing joist chalk lines from the original construction, find the appropriate flavor of nails, and hammer ‘em in. Not up to finish cabinet carpentry standards, but not bad for something you are going to bury.


________________________________________________________________


You know how floors creak in places when you walk around? Well that drives me nuts. In an old house, it’s just part of the character. But this house, unfortunately, has about zero of THAT kind of character. So the creaks and noises have to go. Based on some observant stomping around, it looks like most creaks come from the free ends of the subfloor rubbing against each other. The subfloor panels are nailed to the joists pretty well, but the ends that float in space are free to move. I figured that if those free ends were securely nailed to the sub-subfloor (there’s probably a better term for that), the relative motion would be gone, and the floor would be quiet. Worth a shot.

- Best case: easy solution for a quiet floor.
- Worst case: LOTS more nails for the poor guy who eventually has to remove this subfloor. Not my worry! (I hope…)

So I got some 1½” nails, the kind with the texture-ey, ringed shanks. These would provide some grip. Finishing nails would NOT work for this. I sunk two pairs in every 16” length of non-joist supported subfloor joint. I countersunk these the best that I could. That was made more difficult because these nails had a good sized head. Full countersinking wasn’t really necessary – I just wanted to be sure the heads were not sticking up at all. That’s still a lot of whacking.

The result: a very quiet floor. Score!!! A best-case scenario for a change!
________________________________________________________________


On to the last subfloor patch – the plywood bit over my the bricks. This took some hacking to get out. I had to do some near-free form cutting with the circular saw. That’s always hairy when cutting close to things you don’t really want to hit, like, say, BRICKS! Since I could only get so close to the wall, I had to do the rest of it with a drill and chisel.

Here's a little excavation hole I chiseled to make sure I knew exactly what I was chopping into. No surprises.


And here’s the cut-out itself:


Uh oh. Could have a problem with the OSB board. I’ll have to head down to the crawlspace to see what things look like from down there. I may have to beef something up. That’s a job for tomorrow.

Tools of the day:

Tuesday, October 6, 2009

Great Room Project, Tuesday 10/6

Floor prep 1


Another glamorous, kneepad-intensive day here. But I did accomplish several good things.


1) I pulled all the carpet pad staples out of the subfloor. The kneepads got a good workout, along with a screwdriver and a pair of pliers.


2) I figured I'd just replace the 4'x4' sheet of subflooring that had the water damage. The original nails had been countersunk with good success, so I had to resort to a little help from my chisel to get them out. One all the nails were unearthed, the whole section came right out.


Surprise! Under the subfloor was another layer of waferboard. Or maybe OSB. Brother Tom would know. I thought I'd be peering down into the depths of the crawlspace (** see below), but no. This was very good news, for several reasons:
  1. Sure makes replacement easier.
  2. This means I can screw or nail any high spots securely to the sub-subfloor below.
  3. I should be able to more easily fix that plywood area near the brick pavers.
Here are today's before and after shots. Like the before and after nail hole wall spackling pair, I'll spare you any before and after staple removal photos.


Carb o' the Day

Water damage zone, before


After

If the rest of the water spot is raised up, I'll just cut out a small section, instead of replacing a whole sheet!


The afternoon was graced by a visit to the local Home Depot where I got to do a Big Tool Purchace. Everyone knows that guys like me do these projects mainly to justify buying more tools, power and otherwise. Today I picked up a powered miter saw, a workstand for it, and a chalk line. And a sheet of 5/8" fiberboard to make the big subfloor patch. Now my life has meaning.

==============================================

Non great room editorialising:

Personal transport: I tell ya - you're not going to catch me driving a pickup truck unless I someday have reason to haul a lot of manure. Or maybe loose gravel. If you have to drive (as opposed to bicycle), minivans just rule!

Big boxes: Home Depot vs Lowe's. I usually buy stuff at Lowe's. There is one very close to my house, I know where things are there, they are always supremely helpful, and they usually have what I need (except for odd bass hardware bits, but that's asking for a lot). The Depot sometimes has a special tool I need, or maybe I'm driving by anyway, so I sometimes go there.

BUT... Lowe's has a much superior soundrack. Whoever does their Muzak does a real good job. It's always interesting, non-intrusive, appropriate, and played on a good sounding system. Well, good sounding for a big box store. I often hear music that I recognize and like there. Sometimes I catch myself browsing longer than I really need to. The Depot, on the other hand, cranks out cheesey, overplayed, bottom-of-the-barrel 80's pop hits thru water-damaged speakers. I just can't get out of their stores fast enough.

==============================================

** The Big Crawlspace Makeover is a somewhat painful project that I took on last summer. I did NOT blog that one! For one, photography would have been a real challenge, far beyond my point 'n' shoot abilities and patience. For two, it's a crawlspace, dangit! NOBODY ever said, "Chicks dig guys with nice crawlspaces."

Monday, October 5, 2009

Carb o' the Week

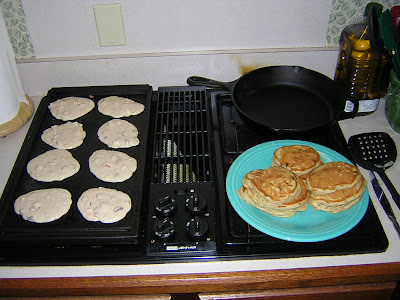
Back to pancakes for this weeks' featured carb.


Double batch of 'cakes, starting with the classic Betty Crocker recipe. Changes:

  • Substitute buttermilk for 1/2 the milk (adjust baking powder and soda accordingly)
  • Use 1/2 whole wheat, 1/2 plain old white flour
  • mix in the big half of an apple, diced up fine (just eat the remaining bits)
  • mix in a handful of Craisins.

I think it's time to do something about that backsplash. Maybe when the Great Room is finished! The burn mark on the plain Formica is mostly hidden by that cast iron pan. Pretty grim.


Sunday, October 4, 2009

Great Room Project, Friday 10/2

Day Six: Paint touch-up, moving large and heavy objects, then DEMOLITION!!!

Today starts with an empty breakfast room (the zone with the brick pavers) and a great room full of very large, very heavy furniture, and has to end with a breakfast room full of large and heavy furniture and an empty great room. And something has to be done with the stack o’ hardwood along the way.

Start of the day: See yesterday’s pics.

Step 1) Move hardwood, again! Into the hallway this time.


Step 2) Touch up paint chips up by the ceiling where the masking tape pulled of some paint flakes. Not much to show here except the disappearance of small but annoying defects.


Step 3) Empty Great Room

I needed something to pad the bricks with so that the heavy stuff won't scratch
them up. Since the carpet is destined for destruction, and it cut easily with a utility knife, I chopped small squares out of it and made furniture slides.

The tall, narrow end units of the entertainment center were easily moved with my hand truck. Remember what they say – “Chick dig guys with nice hand trucks.”

None of the big stuff slid on the carpet at all, but the piano moved easily enough one end at a time.

The real challenge was the big, honkin’ center section of that entertainment center, or TV Cave for short. If that thing were any bigger, it’s internal gravity would collapse it into a black hole. I could grunt a lot and move it just 5 or 6 inches at a time. So I went back and forth and inched it over to the bricks, then set it on the carpet scraps and nudged it off the carpet. Uff da!!! Some day I’m going to have to figure out a way to weigh this junk. In the meantime, I really don’t want to know… But I can say is that it is a LOT heavier than a Hammond B-3 organ.


Step 4) DEMOLITION TIME!!!

The carpet came up easily. The good ol’ Stanley utility knife chopped it into four convenient sections.


The pad underneath had some unusual color things happening, the explanation of which is still a bit of a mystery.

The color had faded very uniformly EXCEPT where there was a large object sitting for a long time. You can see colorful outlines of the piano, the TV Cave, and even where some small stereo speakers were placed. At first I thought it was plain old dirt. But it was too uniform.
.
.
.
.

Then I thought it could be a pressure thing, but the TV Cave really only makes contact with the floor around the edges. And there was no corresponding bright rectangle under the wardrobe that was in the opposite corner. And it is also bright under a strip of tape that held two rolls of padding together. Weird. But alas, it too was about to be destroyed, and perhaps the mystery with it. Out the padding came, and into the Rockvahn it went.

.
.
.
.
.
.
.
.
.
.
.
.
..

The "tackless strips", those perversely misnamed wood strips with nails poking out of both sides that hold the carpet in place, had to be pried up nail by nail. And the nails were 6" apart, max. Lots of whack and pry, whack and pry. Knee pads were essential.


The Rockvahn ready for the trip to The Dump.


Today's tools of the trade:

===================================================================

Some possible, umm, "issues":


1) At some point in time there was a big water spill. I suspect an evil plant. The subfloor was saturated for some time, and the fibers softened and expanded, leaving a high spot. Looks like I will be hacking out and replacing a section of the subfloor. Fun.


2) It looks like the brick pavers were laid on plywood surface that 's a bit thinner than the subflooring in the rest of the room. The builders left a small bit of plywood exposed, and laid the carpet right over it. No problem for carpet, but for hardwood, that thickness difference will have to be leveled out. Not sure exactly what to do there. I do NOT want to hack it out and put in a piece of subfloor, because that gets me into cantilever and bits-floating-in-space issues. Maybe I need to Google "bits-floating-in-space: how to negate".

===================================================================

A couple bird's eye views of today's damages:


Those guys who built this house were real neatniks

Note the floating orbs in the photo below. Yes, they really are called "orbs". Some whackos think these are ghosts. They are really just out-of-focus dust bits reflecting the flash. These compact digital cameras are prone to this because the flash is so close to the lens. I learned this after cleaning the lens about, ahem, 50 times, thinking it was dirt or cheese or grease. Nothing helped. But a few minutes online set me straight. I just had to read around the paranormal crap-o-la to find the real answer.

Great Room Project, Thursday 10/1

Day Five: The rest of the painting.


I needed a step ladder to reach the fourteen foot high peak of this room. As long as I can reach the high corner with a paintbrush and a sander, I should be okay. I figured a ten foot ladder would do it, seeing that I a six feet tall, plus the reach of my arms. There was an HVAC contractor down the street selling a bunch of ladders on Craigslist. Turns out they were three-legged ladders instead of the traditional four-legged ladders. Apparently this is standard in Colorado, where they moved from. The price was right, and I couldn’t come up with a reason why three legs is inferior to four, so I went for it.

Guess I should take a picture of it: Notice the "Kingsford Flivver" shirt.


It works fine, if a bit unusual. Very stable – everyone knows that a tripod is more stable than, say, a four-legged table, especially on an uneven surface.

Today’s job was the large wall. Cutting in the ceiling and masking the wood details around the wet bar were the only slow work. Rolling that big section of plain wall was fast and rewarding!

Not a lot of photography today...


Wednesday, September 30, 2009

Great Room Project, Wednesday 9/30

Day Four: Painting!


Okay. It's about time to make a real, observable, visual difference in this room! Paint always helps with that. Might as well start with the small, low walls, and move on up to the big, high ones as I progress around the room.
.
Not a lot to report on technique or tools here - painting is painting.
.
Mask or use an edge shield around the windows and fireplace. Cut in the ceiling/wall interface carefully by hand.
.
I only used a gallon of paint on the first three walls. I was suspicious when they said a gallon covered 400 sq.ft., but it looks like they are right. I have somewhere around 700-750 sq.ft. to paint in this room.

.
.
.
.
Hot Shot Quiz Question for you digital photography people: what causes those light-colored, round artifacts in the picture on the left? The ones that look like floating bubbles. I've see these on a couple images I've taken this past week.

Great Room Project, Tuesday 9/29

Day Three: Move stuff and prep the walls for painting

Now, HERE"S a low drama day, photographically. Fill holes with spackle. Sand smooth. Whee!

This actually involved a lot of climbing around on ladders. Skills learned from years of rock climbing came in handy. When the painters took down their masking around the wall/ceiling corners, some small bits of wall paint came off with it. These had to be filled and sanded, along with any overspray lines. I got to use my new pad sander. And make some dust.

The visual difference between Day Two and Day Three, as observed from more than three feet from any wall surface, looks like this:


.


Great Room Project, Monday 9/28

Day Two: Baseboards out.

Today’s task was to extract the wood baseboards. This step really can’t count as “Demolition”, since I needed to reuse pretty much all of the trim, which complicates matters somewhat. The baseboard trim was actually in two pieces: a basic 1”x6” rectangular board, topped with a piece of fancy milled trim. The guys who originally put in this trim got pretty happy with the nailer. These bits were really stuck in place!

Here are the tools: crowbars are good. Putty knives are good for breaking any paint seal. The big putty knife was good for protecting the wall while using the prybar, at least until it broke. I’ll blame it on one of the rabbits. Pliers for pulling out nails, hammer for whacking things in general.

It probably didn’t help that I still had the carpet in place, since that would have made prying from the bottom easier. But I hadn’t cleared the room of the big, heavy furniture pieces, and I figured it would make a fine drop cloth for painting.

Again, not a lot of drama in the end o’ the day photo. Just the same room without some wood bits. Whoopee. Yay, me.


The gold/orange/brown area on this wall is the test spot for the new paint. My local Lowe’s (My favorite place. I save hundreds of dollars there. Every week.) will sell you a mini-can of any color you want for $3. Deal.


Bruno says: “Hey – don’t blame ME for destroying your putty knife!”


I ended up breaking just one piece of the milled trim, but it was glue-able. I also had to glue a number of bigger chips that happen when you extract a nail from a hunk of finished wood. No big deal, either one.

Tuesday, September 29, 2009

Great Room Project, Friday 9/25

The great Great Room makeover is officially underway!


Here's the rough game plan:
- paint ceiling
- pull off baseboards
- paint walls
- tear out wall-to-wall carpeting.
- install hardwood floors
- baseboards back in.

Somewhere along the line we need to find a new couch and maybe a chair or two. We're thinkin' IKEA, since they just opened up a store in Charlotte, and have such good meatballs.

The room was blessed (as in "bless your heart" - Southerners know what that really means!) with a textured popcorn ceiling. It was there when we bought the house 14 years ago. I guess they are easy to install and cover a range of drywalling sins. So the project has to start with ceiling. I didn't really want to deal with either:

1) trial and error learning spraypaint technology

2) rolling paint with an ultra-thick napped roller, onto a surface of questionable integrity, that angles from 9' to 14' high.

So I called in the pros on this one. They came in on Friday morning, temporarily entombed the entire room in plastic, did their thing, and were out in about 6 hours. I didn't think to take pictures of this operation. Dang!

Here are some not-so-exciting photos. What do you expect - it's just a plain white ceiling! Not a lot of drama there. But it did brighten the room up quite a bit. I guess dinginess happens after 14 years.


I had time in the afternoon to run up to Lumber Liquidators and load the Rockvahn up with hardwood for the floors. Let me tell you - that thing was riding low on the way home!


Sunday, September 27, 2009

Carb O' the Week

Yikes! It's been decades since the BlichBlog has been updated. No better way to break the bad old non-posting habit than with a new Carb O' the Week, eh?

Let's start with this evening's "Stump the Chef" dinner, with apologies to NPR's Lynne Rossetto Kasper. In the fridge was:

  1. one green pepper


  2. some 'shrooms


  3. an onion


  4. two leftover grilled Italian chicken sausages.


  5. some chopped up garlic in oil


  6. leftover whole wheat ziti


  7. feta cheese

Chop up 1-4 as needed, saute in olive oil with the garlic, throw in pasta, season with s+p and basil. Sprinkle with feta. Eat.


Thursday, September 11, 2008

Dr. Plant


So over the summer I was heading out of the doctor's office with BlichMa when we spotted a very interesting plant in the big flower pots outside the doors. Upon closer inspection, one of them had little buds on the edges of its thick, fleshy leaves. I gathered three tiny plants and potted them at home as my friends laughed at me. I kept the plants in a makeshift greenhouse made of a gallon-size Ziplock bag.

And now, two months later, Dr. Plant is doing quite well. He lives on the edge of my desk and is starting to reproduce himself. He is a very pleasant little guy.

Sunday, March 9, 2008

Pete the Rabbit's Project

The rabbits do keep busy, especially if you give them some tools to work with. Or at least an empty canvas upon which to start. This project started out as a solid Staples cardboard box. Good for sitting on top of, but not much more. It sat in the cage for several weeks, and fuctioned only as a perch. The bunns essentially ingnored it.

So, I cut a small hole in it, just big enough for Pete to squeeze in through. This "front door" provided the catalyst for rabbitly creativity. The box now looks like this:


Front door, quite expanded.


Side door / window combo. The structural integrity of the box is beginning to get compromised. Pete is NOT worried. Bruno SHOULD be worried. No more perching for the big boy!
(The squeegee is NOT a part of the project...)


Back window - this side butts up against the back of the cage, so these opening are not doors, they are fenestration. Unless they move relocate the project.


And last, but not least, is the skylight.

Saturday, February 16, 2008

59th Annual American Mathematics Contest 12


Hello All,

The American Mathematics Contest 12 (AMC) was distributed Tuesday morning at nerd school. Much to by delight, it was an exhilarating challenge full of unusual problems with unconventional answers. I hope to take Advanced Problem Solving next trimester if I can talk the registar into moving my schedule around. While the official results are not back yet, the answers were posted on a bulletin board after the test. I scored just 2.5 points short of qualifying for the next round. One question would have made all the difference. Just wait until next year.


-c

Thursday, February 7, 2008

Pancake Tip

When making pancakes, always include one ingredient that you are unsure of the origin of.

For example:

  • Use up that little bag of unlabeled flour that’s been hiding in the corner of the fridge.
  • “Is this wheat germ, or some kind of ground nuts in this jar?” Throw it in!
  • Not sure if it’s yogurt or sour cream? Whatever…


This will help guaranty hearty, one-of-a-kind pancakes.

Beware: Sunflower seeds do go stale.

Tuesday, January 8, 2008

Uncle Frank Hat


Knit Picks Ambrosia, 2 balls (110 yards, 50 gr each) 20% cashmere, 80% baby alpaca
Cascade Fixation, about 10 gr
Needle—4 & 5 or size needed for gauge
Gauge—8.75 st per inch unstretched (this stitch pattern draws in a lot—very stretchy)

Provisional cast on 140 stitches on larger needle with waste yarn, crochet cotton works well.

K one row in Ambrosia to prevent Fixation from showing through at the hem joining round.

Switch to Cascade Fixation and smaller needle, K around for 11 rounds. Keep the Fixation under tension while working.

Switch to Ambrosia. K one round, then P one round for a turning ridge. Switch to larger needle and begin Beaded Rib pattern:
Work about 12 rounds until outside matches hem length when folded along purl ridge. Undo provisional cast on and place released stitches on a second circular needle, a smaller size works well. Work an outer stitch together with an inner hem stitch in pattern around to join. Continue in pattern to a total length of 5.5 inches from purl turning ridge. Place markers every 20 stitches, between stitch 2 and 3 of pattern. *Work to 2 stitches before a marker, knit 2 together, continue in pattern repeating decreases around. Work a round in pattern without decreases.* Repeat these two rounds until 70 stitches remain. Then decrease every round, maintaining pattern. When 7 stitches remain, cut yarn, draw tail though stitches twice and weave ends in.